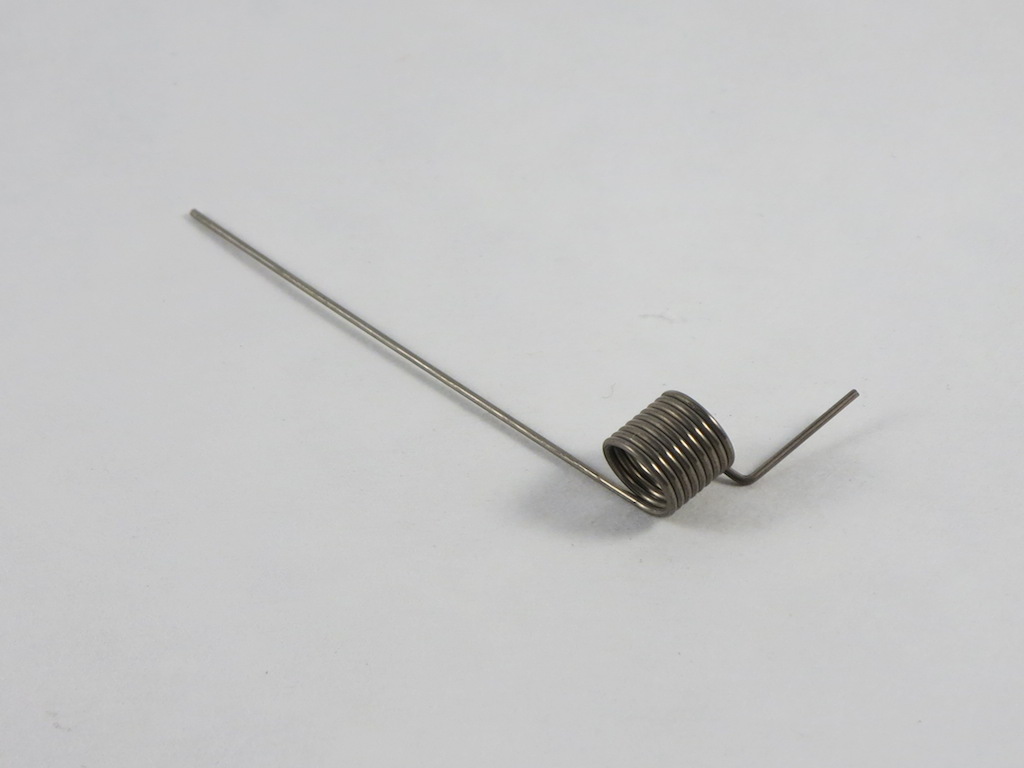
Today a thumb valve spring snapped on a student’s Conn 8D during a lesson. Obviously, we had to take a break to assess what happened, and to determine if I could do the repair myself or if a trip to the repair shop was in order. While we didn’t have an identical replacement part, I was able to fashion a workable solution from existing materials, see below.
I did not have a spring shaped like this in my drawer of replacement parts, but I did have some generic valve springs, as shown below:
Comparing the two, I was able to fashion something close using wire cutters and needle-nosed pliers. First I cut the spring roughly in half with wire cutters:
Then I used the pliers to shape the spring into something that looked close to the original:
It isn’t a perfect fit, but after a little fiddling and bending the sharp spring edges down, it is functional. See picture and video below.
Not bad for a day’s work, and this should work nicely until a repair technician can replace the part. Do you have some horn DIY stories to share? Feel free to comment below!
In this post from several years ago, I discussed the process of changing rotor stops, or “bumpers” as they are sometimes called. It’s a fairly simple, if a little time consuming, process. In the article I mentioned purchasing my rotor stop material from Osmun music. Along with Osmun, there are many other great horn shops out there who sell the material in varying diameters, hardness (duro), and materials. However, another place to check out is the O-Ring Store, a wholesale retailer based in Idaho. Their O-Ring cord stock can be purchased by the foot, in Neoprene, Silicone, Buna-N, among other materials. It is extremely economical to buy rotor stop material this way, as long as you know the diameter you need for your horn, and the type of material you want.
While practicing this summer, I heard a soft “pa-ting” from my horn, and knew pretty much right away what it was; the spring on one of my horn’s two water keys had broken. Though not a common occurrence, the metal on these springs can and will wear out from time to time, requiring a replacement. Rather than take the horn to a shop, I decided to attempt the repair myself. It is not difficult, and only requires a few tools. Here’s what you will need if you want to try it yourself.
Wire cutters, for trimming the ends of the spring
Screwdriver
Replacement spring(s): You can order these from a variety of places, including Votaw Tool and Allied Supply. Not knowing exactly what to use, I bought an assortment of springs for a few dollars total. The first spring I tried, listed as a “Trumpet Water Key Spring,” fit the horn just fine, but didn’t have quite enough tension to function properly. The next one I tried, listed simply as a “Waterkey Spring,” also fit and had a similar tension as the other water key already on my horn.
Water Key Tension Tool/Installer: This little device is meant to hold tension on the spring as you install it, and seemed like a very handy item to have. However, I wasn’t able to use it for this particular job because it simply wouldn’t fit in the space without hitting the tubing. Should you wish to make one of these yourself, you can find detailed instructions in Glen Perry’s The Essential Guide to Horn Maintenance.
The subject of maintaining and performing basic repairs on the horn is obviously very important, but to my knowledge it has not been discussed previously in a single, dedicated volume. Glen Perry, a freelance horn player and professional repair technician, takes on this daunting task in his new book, The Essential Guide to French Horn Maintenance. Drawing on his thirty years of experience, Perry – whose Hornworld website predates my own by several years – has put together a fantastic and very user-friendly guide. Although I have produced some tutorial videos and other materials for students on this topic, I am by no means an expert, and it is great to see something published by a professional repair technician. After reading through the book a couple of times, I am very impressed with his thorough (yet straightforward) explanations.
All of the major issues are covered, including several basic but frequently misunderstood tasks like oiling valves, greasing slides, and changing strings. More detailed procedures such as removing and re-seating rotors and replacing valve and water key springs are also given plenty of discussion. One of the most fascinating chapters for me is “Repair Tools and Supplies.” It contains very handy checklists of equipment and supplies, as well as instructions for fashioning tools for replacing springs and removing and re-seating rotors. Good repair professionals tend to be very busy, and it is extremely rare (and welcome!) to see these tricks of the trade explained in detail. Another chapter is devoted to evaluating the condition of a horn, and covers everything from finding loose braces to testing valve compression. Though widely applicable, chapters on temporary repairs and long term storage of the horn will be especially useful to band directors and other music educators.
Though self-published, the layout and overall appearance of the book is very professional. One minor criticism is that I would have liked to see spiral binding instead of glue binding so that the guide could be laid flat on a music stand or work table. In addition, while I know it would have been more costly to include color images, explanations of some of the more detailed procedures might have benefited from color (or at least higher-resolution) photos. However, these are very small issues with an otherwise excellent guide. It is highly recommended for music educators and horn players at all levels, and should be considered essential reading for all horn teachers and band directors. Bravo and thank you to Glen Perry for producing a terrific book!
Here’s another entry in the “Horn DIY” series, changing mute corks. My go-to straight mute is Ion Balu’s “Red Mahogany” model. Over time the corks that came with the mute have worn and even started to break apart in a few places (see below).
If you look closely at the top of the corks you can see that the one on the right side is missing some pieces. I contacted Ion Balu and he very generously sent me some of his new replacement corks, shown here. Pictured beside them is the box cutter I used to carefully remove the old corks.
Step one in this project is to remove the old corks, using a box cutter or razor blade to cut or pry them loose. My corks began to break apart as I pried them away from the body of the mute, so I resorted to carefully shaving them away bit by bit. Using a very fine sandpaper, I removed the residual cork pieces. What I was left with was a smooth mute without any corks.
Here’s a closeup of the old corks.
Next I attached the new corks, making sure to keep the same placement as the old ones. There are probably a number of adhesives that will work for this task, but I recommend using something that bonds pretty quickly. Here is the final result.
And another view from the top.
Why replace the corks? Well, other than the obvious aesthetic improvement, the mute now plays better than previously. These new corks came with a foam backing (visible in the above pictures) that I assume allows for a more customized fit in the bell. I immediately noticed an improvement in response and overall clarity with these corks. It is a very easy process, requires only a couple of tools, and can breath new life into an older mute.
This week I decided it was time to change the rotor stops (bumpers) on my horn. When I bought the instrument back in February of 2011, it came with silicone rotor stops. These worked really well, but over time they have swollen – a reaction to my valve oil, I assume – and even started to tear apart in a few places.
Changing rotor stops is not difficult, and requires about the same number of tools as restringing valves. Here’s what you need.
Small screwdriver
Exacto-knife or razor blade (use caution)
Needle-nose pliers
Cutting surface
Rotor stop material
The screwdriver is used to remove the old stops, and to install the new ones (more on this later). The knife is used to cut and trim the rotor stop material, and I highly recommend using a pair of needle-nose pliers to hold the material while doing so – it’s much safer this way!
Materials used for rotor stops have changed over the years, from cork to various kinds of rubber and silicone. I ordered mine from Osmun Music, who sells lengths of Buna-N synthetic rubber in varying diameters and consistencies (duro). Here’s what it looks like.
Once you find and order the correct size, you’re ready to change the stops. First, remove the old stops using the small screwdriver. I prefer to change the stops one at a time rather than removing them all at once. I use the same procedure for restringing because it makes it easier to keep track of all the parts. I used my old stops as a rough guide for trimming the new stops. Use the pliers to hold the material on a durable cutting surface – a block of wood works well- and cut carefully. Cut less rather than more, as you can always trim away more material if necessary. Install the new stops using the screwdriver to push the material into place. You may have to do this a few times to get the material situated. Once you’ve done this you need to check the alignment by removing the valve caps. If the stops are cut to the proper size and adjusted correctly, the notches on the top of the bearing should line up with the notches on the bearing plate, as shown in the video below.
If they don’t line up you’ll need to trim away some material until they do. Here’s a picture of the newly installed rotor stops.
One thing I’ve noticed since changing the bumpers is a distinctively different feel to the valve action. The Buna-N material is less spongy than the silicone, and therefore gives less when the valves are moving back and forth. I prefer this more solid contact, and to me it actually seems like the valves are moving faster and more precisely. As with rotor string, it may be worth trying some different materials on your horn just to see if there is any improvement. One other reason to know how to do this simple procedure is because there are lots of school-owned horns out there in various stages of disrepair. I’ve seen numerous students with horns whose rotor stops are worn, misshapen, or just plain missing, with any number of stand-in materials used: pencil erasers, bits of rolled up paper, etc. Needless to say, this probably had an adverse affect on their playing.
With the start of a new academic year our faculty trio, Black Bayou Brass, is looking at some exciting new repertoire for upcoming concerts. As mentioned elsewhere on this site, the literature for brass trio (trumpet, trombone, horn) is often overshadowed by music for brass quintet. However, there are still some great pieces in the repertoire, and new compositions continue to be created. Here’s a look at some of the new works in our folder.
Prelude and Fugue, Oskar Böhme, ed. Bodie Pfost: Ok, so it’s not exactly a “new” work, but it’s new to our group, and is a new edition, which is available for free online.
La Grande Vitesse, Triple Concerto for Brass, James M. Stephenson: Commissioned by the Grand Rapids Symphony in 2009, this three-movement work bears the same name as the sculpture by Alexander Calder, which is located in Grand Rapids. Each of the solo parts includes the name of the player for which it was written (Erich Peterson, solo horn). We haven’t read through this one yet, but just looking at the parts it’s easily one of the more challenging works we have.
French Suite, Joseph Blaha: Dr. Blaha is an Associate Professor of Music, and Director of Bands at Roanoke College in Salem, Virginia. This work was commissioned by the Contrapunctus Brass Trio, and premiered at the 44th International Horn Symposium in Denton, Texas. I was fortunate to get to hear a bit of the premiere from backstage since I was performing on the same concert, and also got to speak with the composer afterwards. After the symposium I contacted Dr. Blaha and was able to purchase a set of parts to this wonderful new brass trio. It contains the traditional dance movements one would find in a 17th or 18th century suite (Allemande, Courante, Sarabande, Gigue), but they have been modernized with chromatic harmonies and mixed meter, among other things. If you are looking for new brass trio music, this one is a great place to start.
Suite for Trumpet, Horn and Trombone, Jean-François Michel: Michel (b. 1957) is a professor at the Haute Ecole de Musique in Fribourg, and is a prolific composer and arranger for brass. Like Blaha’s French Suite, Michel’s composition puts a new twist on a traditional form, with plenty of great writing for all three instruments.
In addition to these original works, we are also busy creating our own arrangements. We will continue to read new material in the coming weeks, and begin to choose repertoire for our annual faculty artist recital from among them. At the same time, we are putting together our program for the NACWPI National Conference in November.
Here are a few more videos of interest to horn players, the first being the newly-updated video page on this site. Rather than embedding all of the clips (which made the page load more slowly), the videos are now categorized and hyper-linked. Feel free to give them a look!
Next is an excellent video produced by the U.S. Army Field Band. Titled Horn Playing Past and Present, the video provides a nice historical background, as well as playing tips and several musical examples featuring the U.S. Army Field Band horn section. It’s nice to see this content being made available on YouTube (by the Field Band), as it was previously only available directly from the band and wasn’t for sale.
The last video for today is from a performance given by Black Bayou Brass (resident faculty brass ensemble here at ULM) in Thailand at Mahidol University on June 5, 2012. The performance was broadcast on public television in Thailand, and we were generously provided a copy of the broadcast. Overall I think the concert comes across very well, with some nice camera work and onscreen titles. Thanks again to Daren Robbins, Horn Professor at Mahidol University, for procuring a copy of the video for us.
Week two of Cannon Music Camp has come and gone, and here’s a brief update on some of last week’s activities.
Great Repertoire: In preparation for their finale concerts at the end of Week 3, the orchestra, wind ensemble, and symphonic band are working on some great pieces with fun and challenging horn parts. Highlights include a band transcription of the Olympic Fanfare and Theme by John Williams, and the symphonic poem In the Steppes of Central Asia by Borodin. The student brass and woodwind quintets are also preparing movements from two standard works for those ensembles, Victor Ewald’s Brass Quintet No. 1, and August Klughart’s Wind Quintet. One of the most beneficial elements of any summer music camp is the opportunity to see lots of repertoire in a short period of time. For many students, the amount of music they rehearse and perform at a music camp or festival is equal or greater to the amount seen in an entire semester at school.
More Lessons: Lessons have been going very well, and I’ve gotten a chance to work with students on some more in depth topics during Week 2. Even though our time at camp has been limited, I’ve been making short practice assignments for the students from week to week. These often involve working on a specific technical exercise, all or part of an etude or solo, or simply making sure to warm up every day. Even in this short amount of time I can already hear improvement in everyone’s playing – bravo!
Solo Performance: On Tuesday I performed on the second of two faculty showcase recitals, playing Eric Ruske’s arrangement of Arban’s Fantasy and Variations on the Carnival of Venice. Kudos to pianist Aaron Ames for putting together the accompaniment in a very short amount of rehearsal time. I’ve been working on this technically challenging piece periodically over the last four years or so, and finally decided to program it on a public recital. Overall the performance went well – it is an impressive sounding work, and will really push your multiple tonguing, flexibility, and all around dexterity on the instrument. Though originally intended for solo cornet, it can be done on the horn, and has been recorded by Eric Ruske and Jacek Muzyk.
Maintenance Clinic: Last Monday’s master class focused on the topic of basic horn maintenance and repair. Even beginning horn players can be taught how to oil valves, grease slides, and restring rotors, and it’s never too early to start in my opinion. We discussed several ways to keep a horn in good working condition, and I put together the following maintenance schedule for the students to use as a reference. (Maintenance Schedule) For another take on this topic be sure to read this article by brass repair technician Dave Weiner.
Here are some other general maintenance tips:
Keep an emergency repair kit in your case at all times containing: screwdriver(s), valve oil, slide grease, rubber bands (to temporarily repair a broken valve spring), and precut and tied lengths of valve string.
Have any major dents in your horn immediately repaired by a qualified technician. The smaller the tubing, the greater the effect a dent will have on the playing characteristics of the horn. (ex. leadpipe)
Depending on the way your skin reacts with the metal of your horn, you may need to wipe clean any fingerprints after playing with a soft cloth and/or purchase a leather/neoprene handguard.
When in doubt, leave any repairs (except oiling and restringing) to a PROFESSIONAL. Trying to disassemble valves or remove stuck slides/mouthpieces without the proper training and equipment will only result in bigger repair bills. Regular maintenance will help postpone or prevent any major repairs to your horn.
There are also a number of helpful “how to” videos on the internet, including this collection I put together a few years back. It was a busy but extremely fun week, and I’m excited about Week 3!
Ken Pope of Pope Instrument Repair recently posted a great video on disassembling and reassembling rotor valves. If you aren’t familiar with Pope Repair, it is located in Jamaica Plain, Massachusetts. In addition to running his repair shop, Ken also sells pretty much anything and everything related to horns. I’ve never purchased a horn from Ken, but over the years have ordered mouthpieces, sheet music, and various other items. The service and quality has always been top notch, and I highly recommend Pope Repair to all horn players. Ken is also very personable and easy-going, which comes through in the video. His instructions are clear and easy to understand, and if you’ve never disassembled a rotor but are interested in learning, this is a good place to start. I believe Ken is planning a whole series of videos on do-it-yourself repairs.
 I did not have a spring shaped like this in my drawer of replacement parts, but I did have some generic valve springs, as shown below:
 Comparing the two, I was able to fashion something close using wire cutters and needle-nosed pliers. First I cut the spring roughly in half with wire cutters:
 Then I used the pliers to shape the spring into something that looked close to the original:
 It isn’t a perfect fit, but after a little fiddling and bending the sharp spring edges down, it is functional. See picture and video below.
 In
In 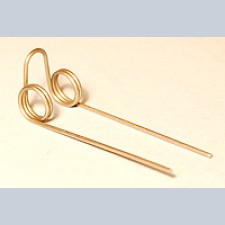
 The subject of maintaining and performing basic repairs on the horn is obviously very important, but to my knowledge it has not been discussed previously in a single, dedicated volume.


